Convert text to speech in XP without any software
Ever wonder you can convert text into speech in XP without using any 3rd party software .. !!
Try this little trick now ..
+ Open a new notepad file and copy the following code :
+ Now save this file with any name with .vbs extension.Dim msg, sapi
msg=InputBox("Enter your text","Talk it")
Set sapi=CreateObject("sapi.spvoice")
sapi.Speak msg
'+-> genuinetechmarks.blogspot.com <-+
+ This creates a VBscript file. When you open this file, it prompts for text. Enter your text and click OK .Now you can hear it .. Enjoy .. !!
Want to share something ... !! Share it in the comments ..
Add your own photos to "My Computer" properties
+ Open a new notepad file and copy the following code in it.
[General]
Manufacturer="Your company name"
Model=Intel® Core™2 Duo
[Support Information]
Line1= address
Line2= your ph number
Line3= Your email or website
+ In the above code, information under General will be displayed when you open 'My Computer' properties and the information under Support Information will be displayed when you click Support Information button.
+ Under this Support Information you can have add any number of lines, Line1 Line2 Line3 Line4 Line5 ... with some information.
+ Now save the notepad file as oeminfo.ini and copy it in the system32 folder.
+ Then open your favourite image and save it as oemlogo.bmp and copy this bmp file in the system32 folder.
+ See the My Computer properties now. You can see your own image and information present in it.
Friends .. Share your experiences in the comments .
Hide system clock from toolbar in XP
Follow the steps ..
+ Open run -> regedit
+ Navigate to the path :
+ Here under policies, if Explorer key is created default, then click on it.If it is not present by default, click policies and in the right box, right click -> new key and give the name Explorer for it.Now click on the Explorer.HKEY_LOCAL_MACHINE\Software\Microsoft\Windows\CurrentVersion \Policies
+ Now in the right box,right click -> new DWORD value and give it the name HideClock.
+ Right click on Hideclock and click modify.Enter the value as 1 and click OK.
+ Restart the sytem and it is DONE ... !!
Share your experiences in the comments ..
Set background picture for any folder in XP without any software
Previously I had written
a post about how to
But, this can be done with a simple notepad trick.
+ Open notepad and copy the following code in it.
[ExtShellFolderViews]
{BE098140-A513-11D0-A3A4-00C04FD706EC}={BE098140-A513-11D0-A3A4-00C04FD706EC}
[{BE098140-A513-11D0-A3A4-00C04FD706EC}]
IconArea_Image=F:\Celebs\hasini.jpg
iconarea_text= 0x00FFFFFF
+ Here IconArea_Image represents the path of your picture and iconarea_text represents the color of the text.
You can get all the color codes here ->

+ Click ok and close.
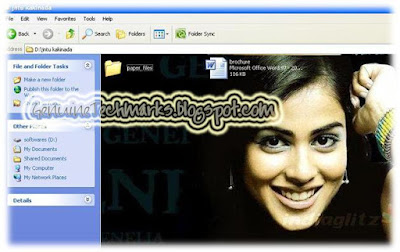
Now you can see the selected picture as background in the folder.
Want to express something .. !! Share here in the comments ..
Change the thumbnail size of photos in XP without any software
Wanna change the thumbnail view size of your photos in XP .. !! This can be done by a simple registry trick without any software.
Follow the steps here to change the size :
+ Open run -> regedit
+ In registry navigate to :
HKEY_CURRENT_USER\ Software\ Microsoft \ Windows\ CurrentVersion\ Explorer
+ In the right side box, right click -> new -> DWORD Value
+ Give it the name ThumbnailSize
+ Right click on ThumbnailSize and click modify.
+ Now change the value data to any number between 20 to 100 (in hexadecimal) or between 32 to 256 (in decimal).
Done .. !! Your thumbnail size will change as your desired size.
When value is changed to 32(in decimal) :
Set background picture to gtalk chat window
+Install the application and navigate through start -> all programs -> dash -> my theme -> click change background.
+ Choose your favorite picture from the window.
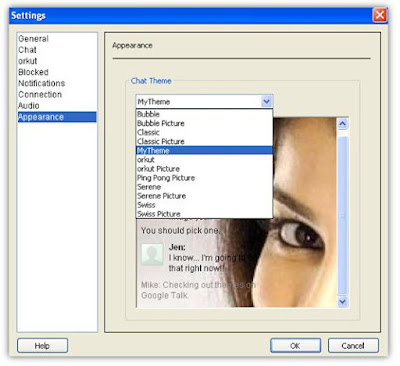
+ Exit and reopen the gtalk.Go to settings -> appearance -> from drop down menu, select my theme and click ok.
You can insert amazing emoticons in the gtalk (see in pic) . The shortcuts for these emoticons can be seen here :
start -> all programs -> dash -> my theme -> click Help
Friends .. share your experiences in the comments .. njoi ..
Set recycle bin to delete files in it automatically
Jus follow the steps :
+ First click on Start button then type Regedit in Run option.
+ Navigate to the following path :
+ Here in right side panel, double click on NukeOnDelete and set its value 1.HKEY_LOCAL_MACHINE\SOFTWARE\Microsoft\Windows\CurrentVersion\ Explorer\BitBucket
+ Now close the registry editor and restart your computer after any changes to go into effect.
Enjoy !! Share your experiences in the comments.
Auto delete temporary folder in windows
Follow the steps :
+Go to run and type gpedit.msc
Computer Configuration/Administrative Templates/WindowsComponents/Terminal Services/Temporary Folder
Now from next time when Windows puts a temp file in that folder it will be automatically deleted when it is created.
Share your experiences here in the comments after performing this cool trick.
Change the icon of removable disk..
+ Save the selected image as anyname.ico (How to do is open the picture in mspaint. and save as anyname.ico).Make sure that selected image is small.
(OR) You can download any icon and name it.
+ Open note pad and copy the following code.
+ Here label indicates the name of ur removable disk and icon indiactes the name of your icon.[autorun]
Label=DILLU
Icon=genelia.ico
+ Now save is notepad file as autorun.inf.
+ Copy both files (autorun.inf and Icon file) to your removable drive. You can make both files as hidden.
Now unplug the drive and connect it back to USB and now you can see the icon of your removable disk.Thats it!!
NOTE : The name of the icon you created and the name in the 3rd line of code must be same.
You can also set the background picture for your removable disk.This trick is explained in my previous article "Set background picture for any drive in windows".
Share your experiences in the comments ...
Open or close cd/dvd drive with a single click in xp
+ Now save this file as anyname.vbsSet oWMP = createObject("WMPlayer.OCX.7" )
Set colCDROMs = oWMP.cdromCollection
if colCDROMs.Count >= 1 then
For i = 0 to colCDROMs.Count - 1
colCDROMs.Item(i).Eject
Next ' cdrom
End If
+ When you click it, the disk drive will be opened.
To close the cd/dvd drive .. follow the steps :
+ Now save this file as anyname.vbsSet oWMP = createObject("WMPlayer.OCX.7" )
Set colCDROMs = oWMP.cdromCollection
if colCDROMs.Count >= 1 then
For i = 0 to colCDROMs.Count - 1
colCDROMs.Item(i).Eject
Next ' cdrom
End If
+ When you click it,the disk drive will be closed.
Share your experiences in comments after performing this cool hack.
550+ Keyboard shortcuts for Adobe Photoshop CS4
+ Keys for selecting tools in extract toolbar :
+ Keys for selecting tools in liquify toolbox :
+ Keys for working with extract,liquify and pattern maker :
+ Keys for using filter gallery :
+ Keys for using the refine edge dialog box :
+ Keys for using the black and white dialog box
+ Keys for using camera raw dialog box :
+ Context menu :
+ Keys for using the curves dialog box :
+ Keys for using vanishing point :
+ Keys for working with blending modes :
+ Keys for viewing images :
+ Keys for selecting and moving objects :
+ Keys for editing paths :
+ Keys for painting objects :
+ Keys for transforming selections,selection borders and paths :
+ Keys for selecting,editing and navigating through text :
+ Keys for formatting types :
+ Keys for slicing and optimizing :
+ Keys for using panels :
+ Keys for action panels :
+ Keys for using the adjustment panels :
+ Keys for using the animation panel :
+ Keys for using animation panel in Timeline mode :
+ Keys for using the clone source :
+ Keys for using the brushes panel :
+ Keys for using the channels panel :
+ Keys for using the color panel :
+ Keys for using the history panel :
+ Keys for using the info panels :
+ Keys for using layer comps panel :
+ Keys for using the layers panel :
+ Keys for using the paths panel :
+ Keys for using the swatches panel :
+ Keys for using measurement :
+ Keys for using the 3D tools :
+ Keys for working with DICOM files :
+ Function keys :